How to Export Photogrammetry 3D Tiles using RealityCapture
Learn how to export photogrammetry models as Cesium 3D Tiles from RealityCapture for smooth, efficient web visualization. Step-by-step guide.


Photogrammetry has come a long way. When I first started, processing models meant overnight waits and frequent crashes. Today, not only is processing quicker but sharing high-quality models online is simpler too, especially with formats like Cesium 3D Tiles.
If you're familiar with RealityCapture, you likely know it's a powerful tool that transforms images into detailed 3D models. But what about sharing these models online? Cesium 3D Tiles are designed specifically for efficiently streaming large 3D models through a web browser.
I'll guide you through how to export photogrammetry models as Cesium 3D Tiles from RealityCapture. I've learned these tips through trial and error… so you won't have to!
Introduction to RealityCapture
RealityCapture is a photogrammetry software known for its speed and precision. It transforms standard images into accurate, textured 3D models, popular among professionals in surveying, architecture, archaeology and virtual reality. Compared to other tools, RealityCapture excels in processing speed, detail and overall model quality, making it a popular choice for projects requiring detailed visual outputs.

What Are Cesium 3D Tiles?
Cesium 3D Tiles are designed for visualizing massive 3D datasets online. They load quickly, even with large models, making them ideal for sharing detailed photogrammetry projects without compromising performance.
Benefits include:
- Optimized Streaming: Only loads what's needed, making models responsive.
- Compatibility: CesiumJS and platforms like Swyvl and Cesium Ion support them.
- Scalability: Suitable for anything from small objects to large terrains.
Ideal Use Cases for Cesium 3D Tiles
Cesium 3D Tiles are useful across various industries, including:
- Engineering and Construction: For remote inspections and tracking construction progress.
- Heritage Preservation: Capturing historical sites and artifacts digitally.
- Virtual Tourism: Interactive exploration of landmarks and tourist attractions.
- Urban Planning: Visualizing city developments and infrastructure projects.
Getting Your Model Ready in RealityCapture
Before hitting that export button, your model needs to be prepared properly. Here’s a quick checklist to make sure you're ready to go:
- ✅ Align and reconstruct your photos accurately. This ensures your model’s quality right from the start.
- ✅ Ensure your model is textured (UV-mapped). Cesium 3D Tiles require textures to display properly.
- ✅ Use vertex colorization for better visual quality (highly recommended).
- ✅ Georeference your model (optional but highly beneficial if you need accurate real-world placement).
Pro Tip: Skipping georeferencing might save time initially but usually causes alignment headaches later. If you plan to use the model in geospatial applications, it should be georeferenced using the WGS84 coordinate system (EPSG:4326), which defines coordinates as longitude, latitude and height.
Step-by-Step Guide: Exporting Cesium 3D Tiles from RealityCapture
Alright, now the fun begins. Here's exactly how to export your photogrammetry model to Cesium 3D Tiles.
1. Open the Export Tool
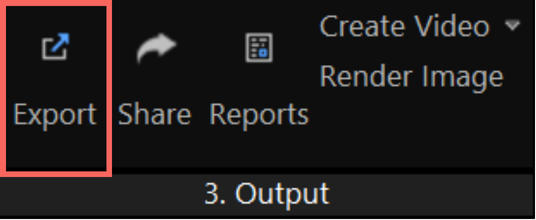
- From the top toolbar, in the Workflow tab, go to Export


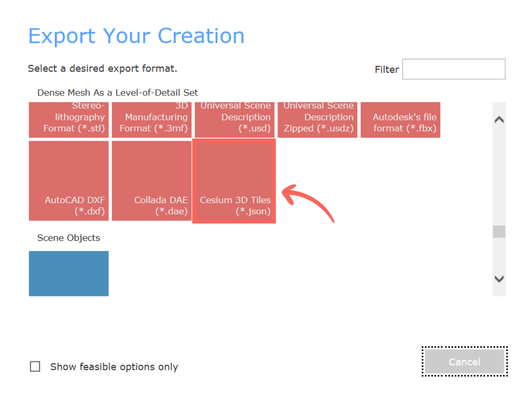
- Select Cesium 3D Tiles from the popup.

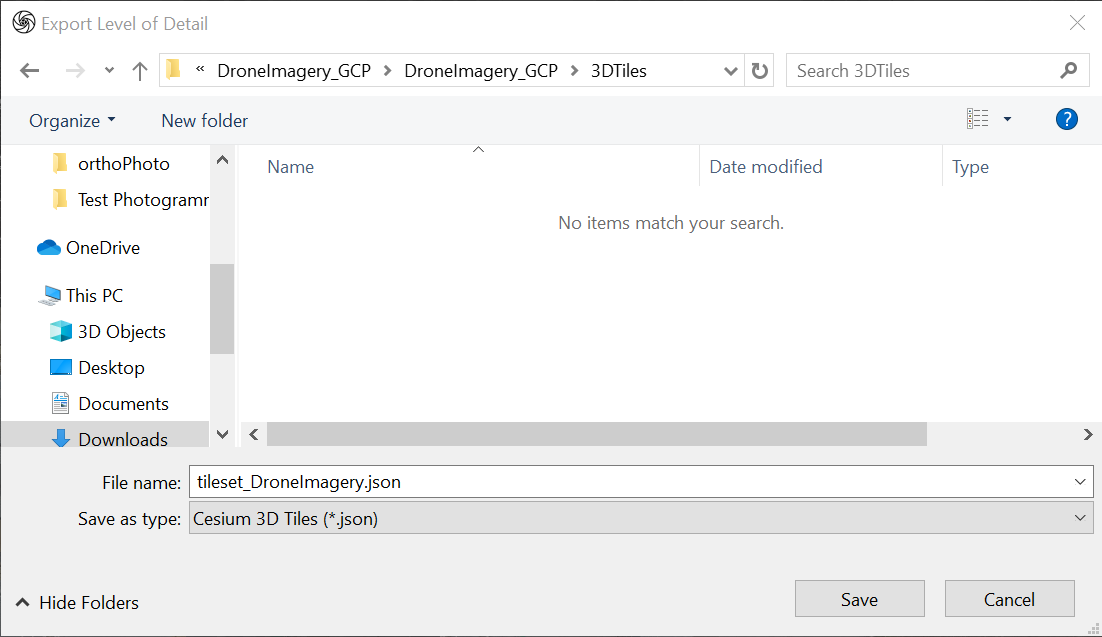
- Choose the folder location you want to save the Cesium 3D Tileset.

Alternative method: Go to SCENE 3D > TOOLS, then under Export, select Levels of Detail.
2. Configure Export Settings for Cesium 3D Tiles (Critical - Do not skip this step!)
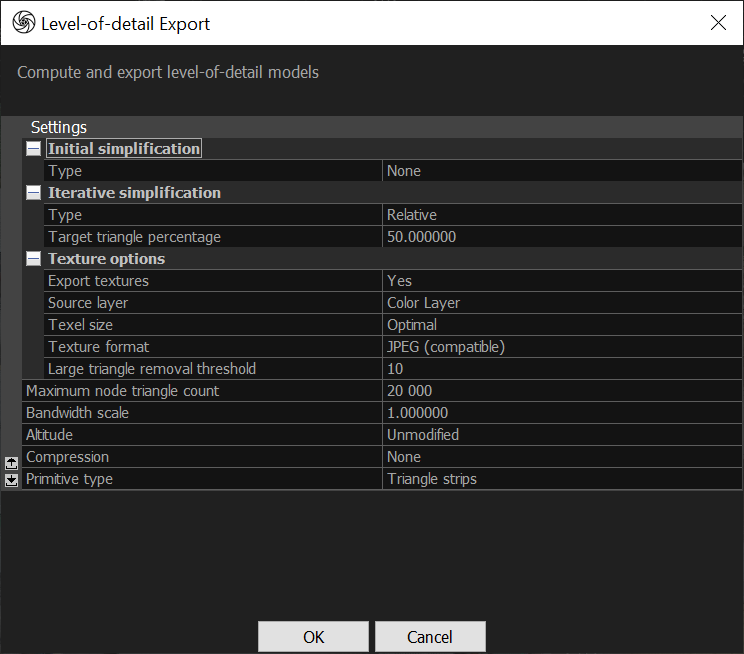
The right settings make all the difference. Here’s what works well for most scenarios and why each setting matters:

Initial Simplification:
Type: None (Retains original detail)
Iterative Simplification:
Type: Relative
Target Triangle Percentage: 50% (This reduces the polygon count by 50%, balancing detail and performance for web streaming)
Less simplification causes slow loading; too much reduces visual quality. A 50% reduction often hits the mark.
Texture Options:
Export Textures: Yes (textures are required for Cesium 3D Tiles and give visual detail)
Source Layer: Color Layer (ensures accurate textures)
Texture Size: Optimal (RealityCapture selects ideal resolution, typically 4K to ensure file quality without excessive file size)
Texture Format: JPEG (compatible) (JPEG provides good compression for web use, reducing file size while maintaining visual quality)
Large triangle removal threshold: 10
Maximum Node Triangle Count: 20,000 (this ensures the tiles are small enough for efficient streaming of Cesium 3D Tiles)
Bandwidth Scale: 1.0 (this default setting is appropriate for general use, as CesiumJS handles its own compression (e.g., KTX 2.0) during rendering
Altitude: Unmodified (suitable for models georeferenced in WGS84).
Compression: None
Primitive Type: Triangle Strips (this format is widely supported and optimized for CesiumJS rendering).
3. Start Exporting Cesium 3D Tiles
- Click OK to initiate the export.
- RealityCapture will generate your Cesium 3D Tileset (multiple files), including a tileset.json file, saved in your selected folder.
Depending on your model size, this is the optimal time to grab a coffee (or two!) while you wait for the files to export.
After Exporting: Preparing Your 3D Tiles for the Web
Once exported, you'll have a folder filled with various files, including your tileset.json and the tiled geometry. Here’s a quick and easy way to prepare it for uploading:
- Select all exported files and compress them into a single ZIP file. This ZIP is what you'll upload to your chosen web viewer platform.
Viewing Your Cesium 3D Tiles Online
Now comes the rewarding part - viewing your model online. There are multiple platforms where you can visualize Cesium 3D Tiles, such as:
The process typically involves logging into your platform of choice, creating a new project and uploading your ZIP file. Platforms like Swyvl make this process straightforward, usually requiring only a few clicks to go from upload to visualization.
Troubleshooting: Common Export Issues and How to Solve Them
Every once in a while, things don’t go smoothly. Here's a quick troubleshooting guide from my own experiences:
- Missing textures: If your model appears white after exporting, this normally means you haven't textured or colorised. Double-check your RealityCapture texture settings and export again.
- Poor performance: If your model loads slowly online, adjust your export settings by reducing the triangle count further (try 40% if 50% is too heavy).
- Georeferencing problems: If your model isn't aligning properly in Cesium-based platforms, ensure your model was correctly georeferenced using WGS84.
Advanced Tips: Optimizing for Larger Datasets
If you’re dealing with particularly large photogrammetry models (think massive construction sites or entire cities), you'll want to push optimization further:
- Tile the model carefully: Consider breaking your model into multiple tilesets if extremely large.
- Adjust simplification aggressively: Experiment with simplification settings more than usual, testing the visual quality each time.
- Balance node size and streaming performance: Always aim for the smallest file size that maintains acceptable visual quality.
Final Thoughts
Exporting Cesium 3D Tiles from RealityCapture makes it incredibly easy to share detailed photogrammetry models online. With the right settings and a bit of patience, your models can be streamed smoothly, impressing your clients, stakeholders or teammates.
Photogrammetry tools continue to improve, making the entire process smoother. Keep experimenting, learning and refining your workflows.
Next Step - Upload Your 3D Tiles into Swyvl: Now that you’ve exported your Cesium 3D Tiles from Reality Capture, it’s easy to visualize them in Swyvl. Check out our detailed Help Centre Guide to learn exactly how to upload and view your models step-by-step.


Ready to explore 360 photos, 3D mapping and more with Swyvl
Get started with a free trial today or schedule a demo to discover how you can be using Swyvl in your workflows.


.jpg)


